
Contents
- Before you start
- Install the app
- Sign in
- Set up your provider profile
- Integrations
- Add a patient by scanning cards
- The patient chart
- Start a visit
- Ask for consent
- Record, pause, finish
- Review and sign the note
- The Talk tab
- The Orders tab
- The Claim tab
- Eligibility
- Send a claim and check status
- Export
- Visits 1, 2, 3 by date
- Offline and on-device mode
- Troubleshooting
- Questions
01Before you start
SOLIS listens to the visit, writes the note, and builds a clean claim, on your phone. A visit always follows the same path:
- Front desk: scan the patient's cards to create or update their account.
- Doctor: start today's visit, ask for consent, and record the conversation.
- Doctor: review the note, confirm any uncertain diagnoses, and sign.
- Doctor or billing: fix anything the claim checks flag, then send the claim and track its status.
What you need
- An Android phone. SOLIS 1.0 is Android only; iOS is not yet released.
- Wi-Fi for the first install and for the one-time voice model download (about 150 MB).
- Your sign-in details from your organization, or the demo account to practice.
- Your NPI, tax ID (EIN) and practice address for the provider profile.
Practice first with the demo account. It is filled with fictional patients, so you can try every screen, including scanning a sample card and sending a test claim, before you see a real patient.
02Install the app
During the pilot, SOLIS is installed from an APK file that your SOLIS contact sends you, not from the Play Store.
- On the phone, open the link to the SOLIS APK that you received. Use Wi-Fi: the file is large because the card reader and the on-device speech engine are built in.
- When the download finishes, tap the file to open it.
- If Android asks, allow your browser or file app to install apps. The wording is usually Install unknown apps or Allow from this source. You can turn this back off after installing.
- Tap Install, then Open.
Only install a file that came from your SOLIS contact. If Android shows a warning about an app from outside the Play Store, check where the file came from before you continue.
To update later, install the new APK the same way. Your patients and visits stay on the phone.
03Sign in
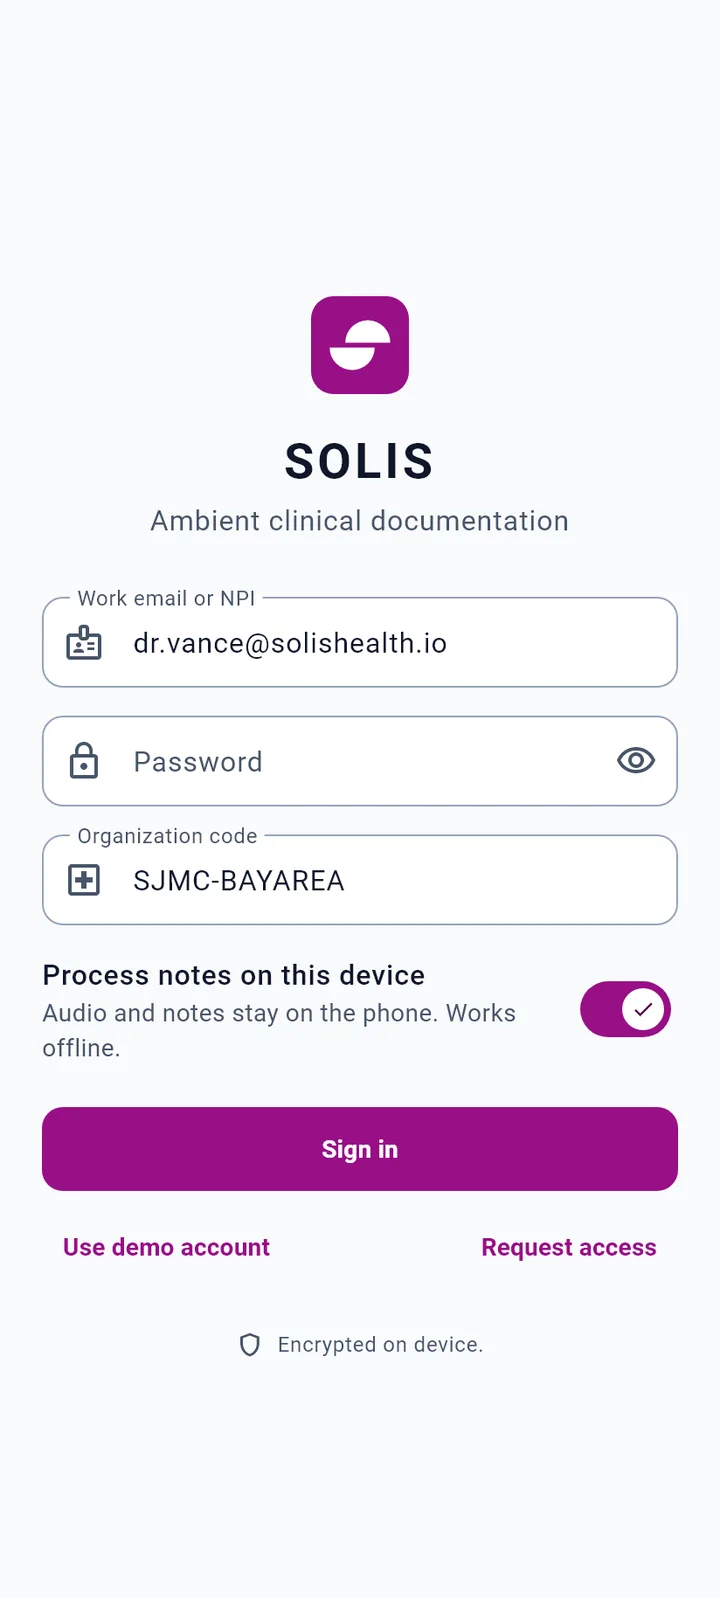
- Enter your Work email or NPI, your Password and your Organization code.
- Choose where notes are processed with Process notes on this device. When it is on, audio and notes stay on the phone and SOLIS works offline. See Offline and on-device mode.
- Tap Sign in.
Try the demo account
Tap Use demo account. One tap signs you straight in with fictional patients such as Margaret Vance and Robert Hayes, so you can explore safely.
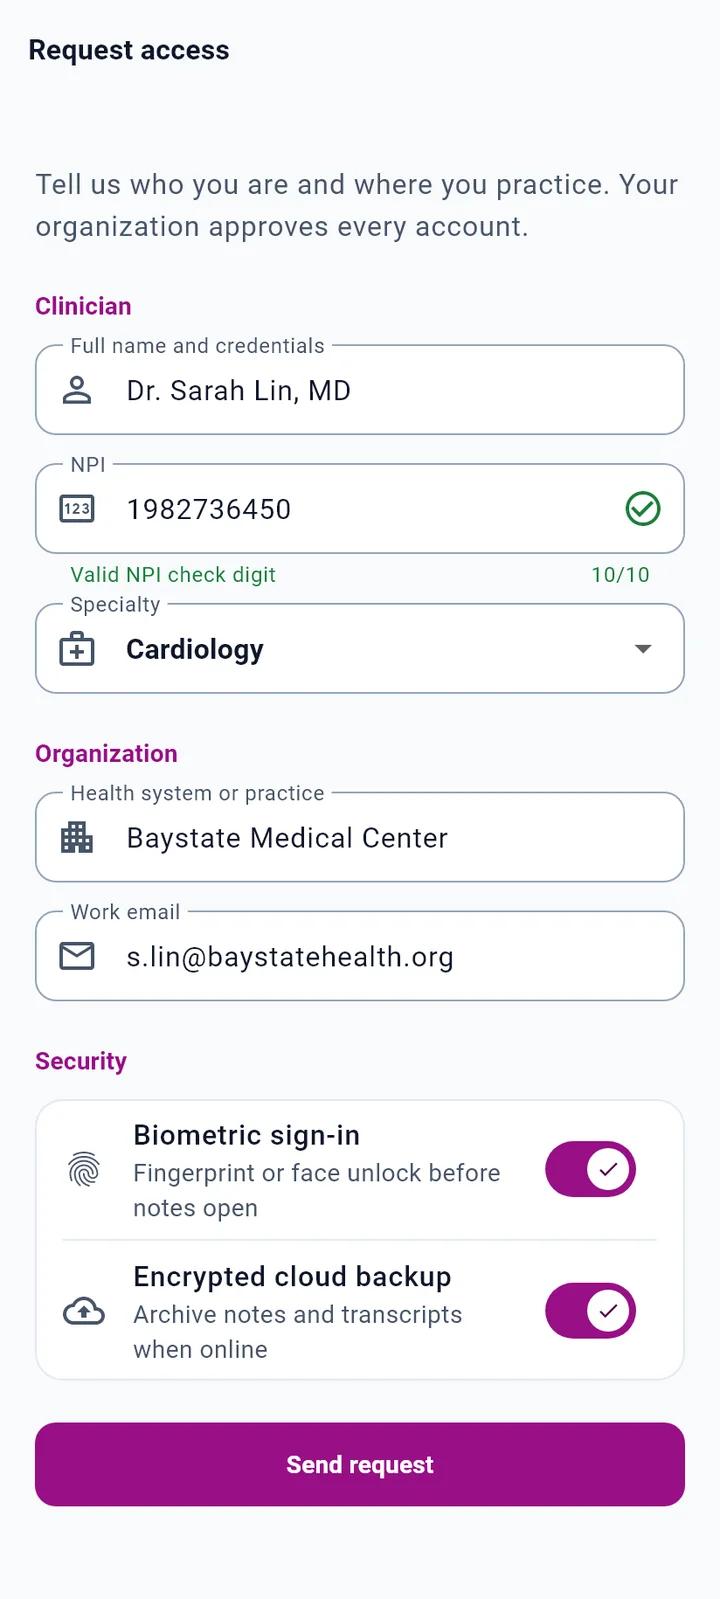
New to SOLIS?
Tap Request access. Enter your full name and credentials, your NPI (SOLIS checks the NPI check digit as you type), your specialty, your health system or practice and your work email. You can also turn on Biometric sign-in (fingerprint or face unlock before notes open) and Encrypted cloud backup. Tap Send request. Your organization approves every account.
04Set up your provider profile
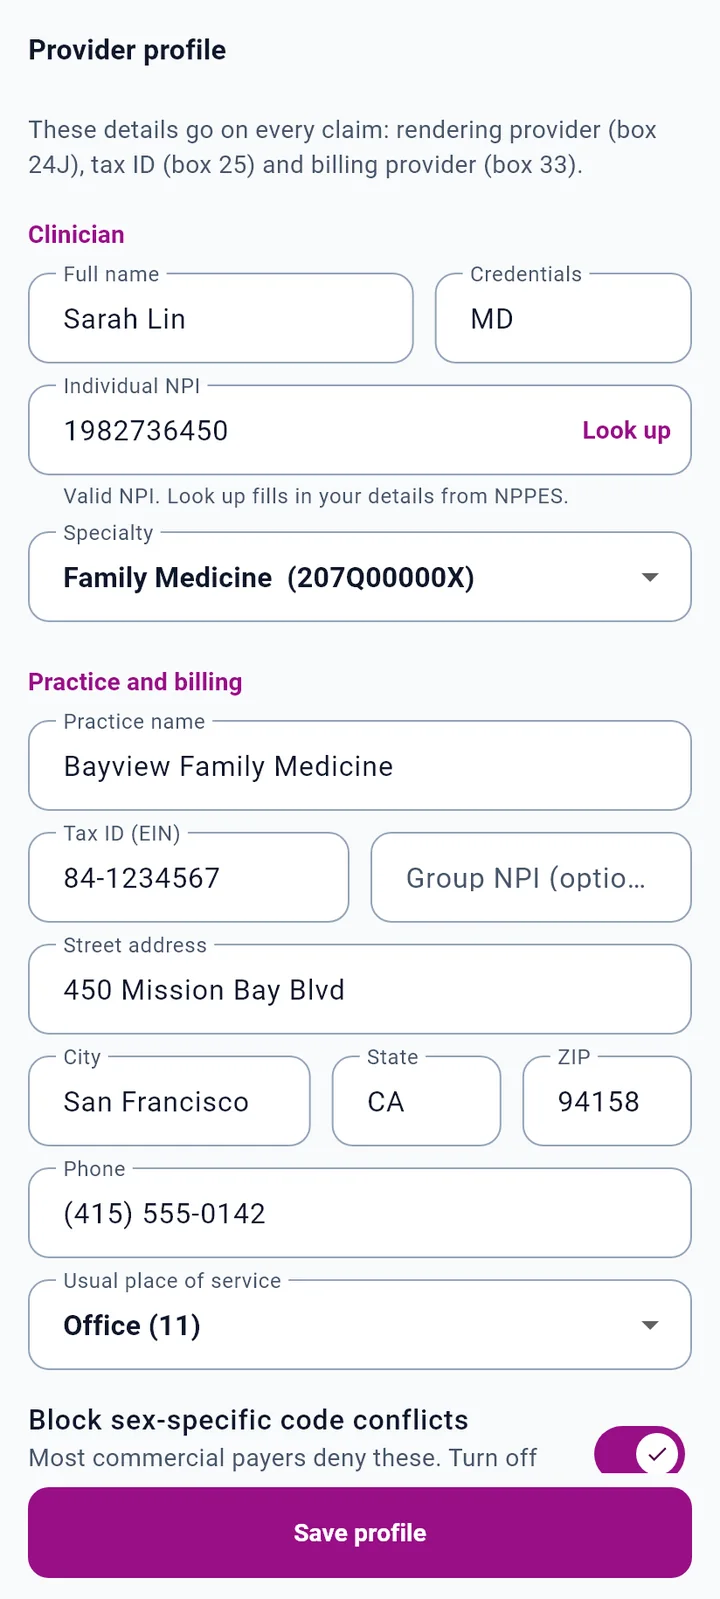
The profile goes on every claim: rendering provider (box 24J), tax ID (box 25) and billing provider (box 33). Set it once before your first real visit.
- On the Patients screen, tap the three-dot menu, then Provider profile.
- Under Clinician, type your Individual NPI and tap Look up. SOLIS checks the national NPI registry (NPPES) and fills in your name and details. If it says no provider was found, check the number.
- Check Full name, Credentials and Specialty. The specialty list shows its taxonomy code, for example Family Medicine (207Q00000X).
- Under Practice and billing, enter the practice name, Tax ID (EIN) in the form 12-3456789, the Group NPI (optional), street address, city, state, ZIP and phone.
- Pick your Usual place of service, for example Office (11). You can still change it on any visit.
- Add the insurers you accept with Add payer.
- Decide on the two switches below, then tap Save profile. You will see "Provider profile saved. New claims use it."
The two switches
- Block sex-specific code conflicts
- On by default. Most commercial payers deny these. Turn it off to show them as warnings instead of errors.
- Block screenshots
- Stops screenshots, screen recording and app previews on this phone. Recommended once you see real patients. While it is off, the visit's session details remind you that screenshots are allowed.
05Integrations
Open the three-dot menu on the Patients screen and tap Integrations. Keys entered here are kept in encrypted storage on this phone only and are never shown again in full. For a whole practice, your administrator can keep keys on the SOLIS server instead, so nobody types them on a phone.
Clearinghouse (Stedi)
Connecting Stedi lets SOLIS send claims, check eligibility at check-in, and track claim status.
- Paste the Stedi API key into the key field.
- Leave Test claims selected while you learn. Test claims are marked T: the clearinghouse checks them, but they are not paid.
- Fill in Submitter name, Submitter ID, Receiver ID (STEDITEST in test mode), Billing contact and Contact phone.
- Tap Save. The card shows Connected with the last characters of the key.
- Switch to Production only after your payer enrollment is complete. Production claims go to payers for payment.
Cloud transcription (Deepgram)
Cloud transcription separates doctor and patient by voice in the cloud. Use it only after a BAA with Deepgram is signed. Without a key, the card says On-device only and SOLIS uses the on-device engine.
On-device voice separation
This engine tells doctor and patient apart by voice on the phone. No audio leaves the device.
- Connect to Wi-Fi.
- Tap Download speech models. The button shows the size, about 150 MB.
- Wait for Downloading ... of ... to finish. If the connection drops, the download resumes where it stopped.
You only need to do this once per phone.
06Add a patient by scanning cards
This is usually the front desk's job. Everything is read on the phone, and card photos are deleted after reading.
- On the Patients screen, tap Scan card.
- Choose the card type at the top: Insurance, License or SSN.
- Tap Scan. For an insurance card, scan the front, then the back: the back usually has the Rx BIN, PCN and payer ID. The scanner finds the card edges and straightens the image. To use pictures you already took, tap From photos.
- Repeat for the driver's license (SOLIS reads the barcode on the back) and, if needed, the SSN card. Green tags such as Insurance card and Driver's license barcode show what has been read.
- Check every field. First and last name are required. Set Sex (as on the insurance record) to match the insurance card, and the Patient relationship to subscriber (Self, Spouse, Child or Other).
- Tap Create account.
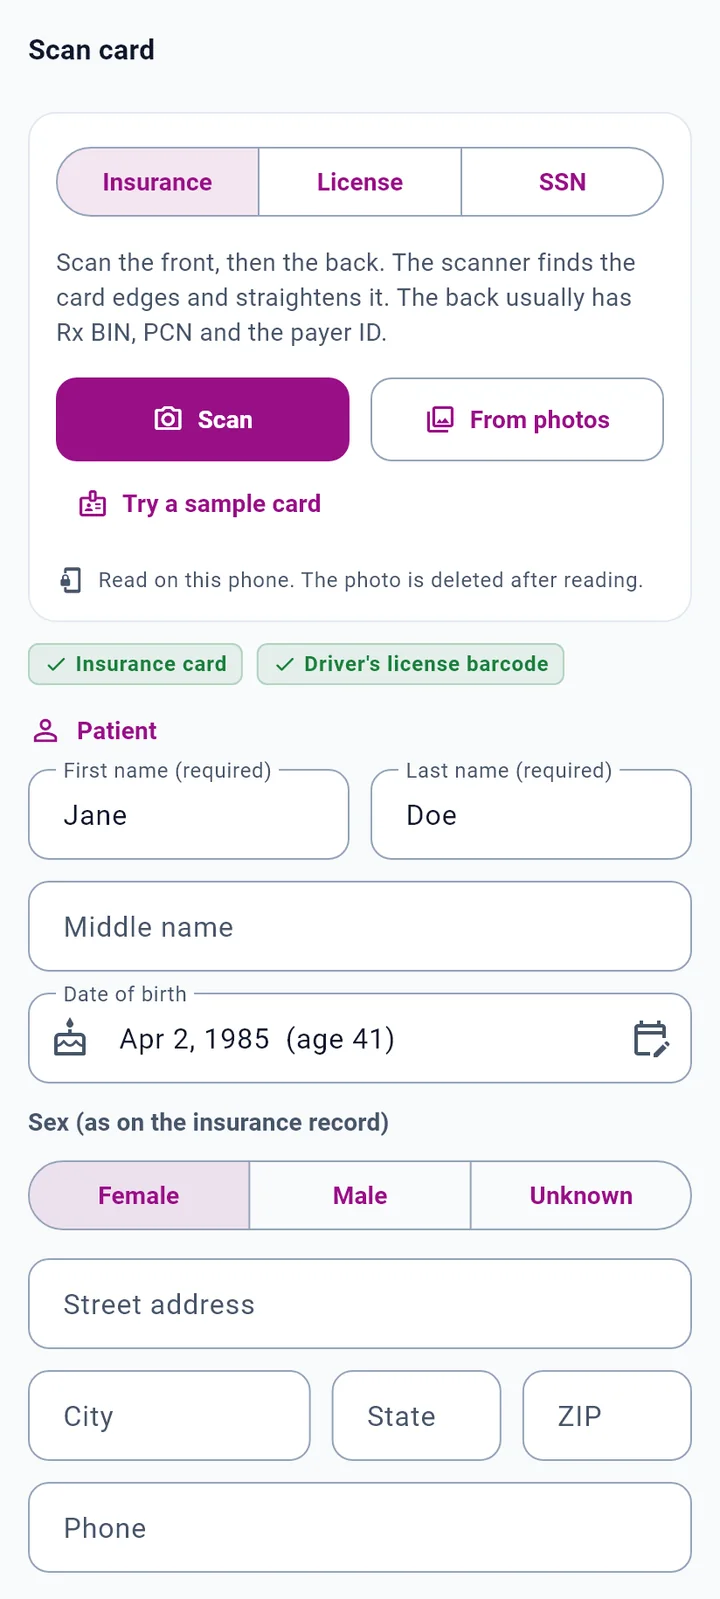
Try a sample card. Tap Try a sample card to run the real card reader on built-in sample cards for the fictional patient Jordan A Rivera. It is the quickest way to see scanning work without a real card.
When the patient may already have an account
If the details match someone already in SOLIS, you will see "This may be an existing patient". Choose their account to update it, so each person keeps one chart, or choose to create a new account. The button then reads Update existing account or Create account.
No card?
Tap the add-person icon at the top of the Patients screen (Add patient without a card) and type the details.
What is kept from an SSN card
Only the name and the last 4 digits. The full number is never stored. The account shows "SSN on file: last 4 digits" and nothing more.
Getting a clean read: hold the card flat, fill the frame, and avoid glare from overhead lights.
07The patient chart
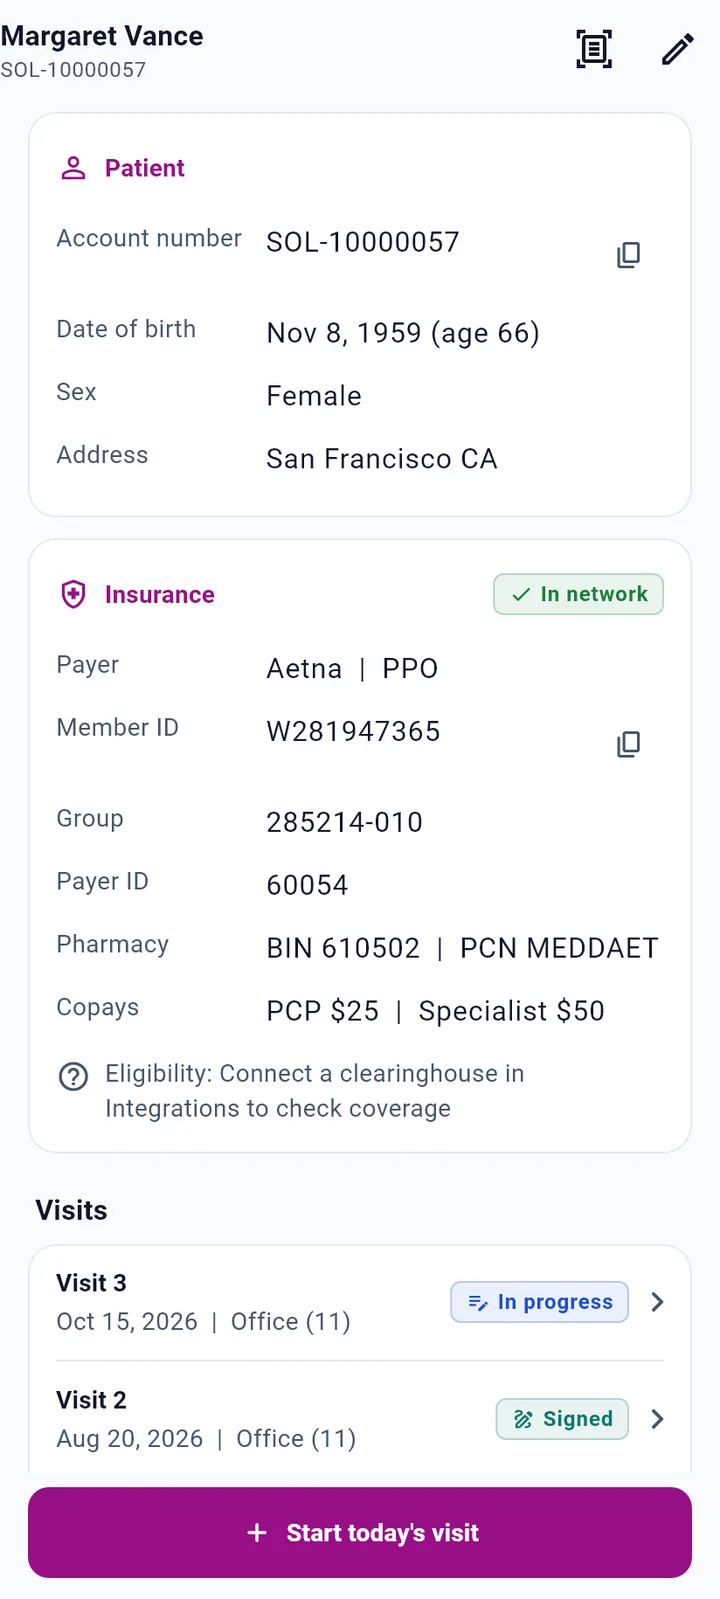
Tap any patient in the list to open their chart. Search at the top of the list by name, account number or member ID.
- Patient
- Account number (SOL- followed by eight digits, with a check digit), date of birth with age, sex and address. Tap the copy icon to copy the account number.
- Insurance
- Payer and plan, member ID, group, payer ID, pharmacy BIN and PCN, and copays from the card. The eligibility line sits at the bottom of this card.
- Visits
- Every visit by number and date, with its place of service and status.
Tap the scan icon at the top to scan a new card for this patient, or the pencil to edit their details.
Visit status tags
| Tag | Meaning |
|---|---|
| In progress | The visit is open; the note is not signed yet. |
| Signed | The note is signed. |
| Claim ready | The claim passed its checks and is marked ready to bill. |
| Submitted | The claim was accepted by the clearinghouse and is with the payer. |
| Rejected | The clearinghouse rejected it before it reached the payer. Fix and resend. |
| Paid | The payer paid the claim. |
| Denied | The payer denied the claim. |
08Start a visit
- In the patient's chart, tap Start today's visit. If a visit from today is still open, the button reads Continue visit with its number instead.
- Check the Date of service and the Place of service. The place of service decides which visit codes are valid and how the claim pays, so pick where you actually see the patient: office, nursing facility, and so on.
- Tap Start visit. If a clearinghouse is connected, SOLIS checks eligibility in the background while you work.
The Ready screen
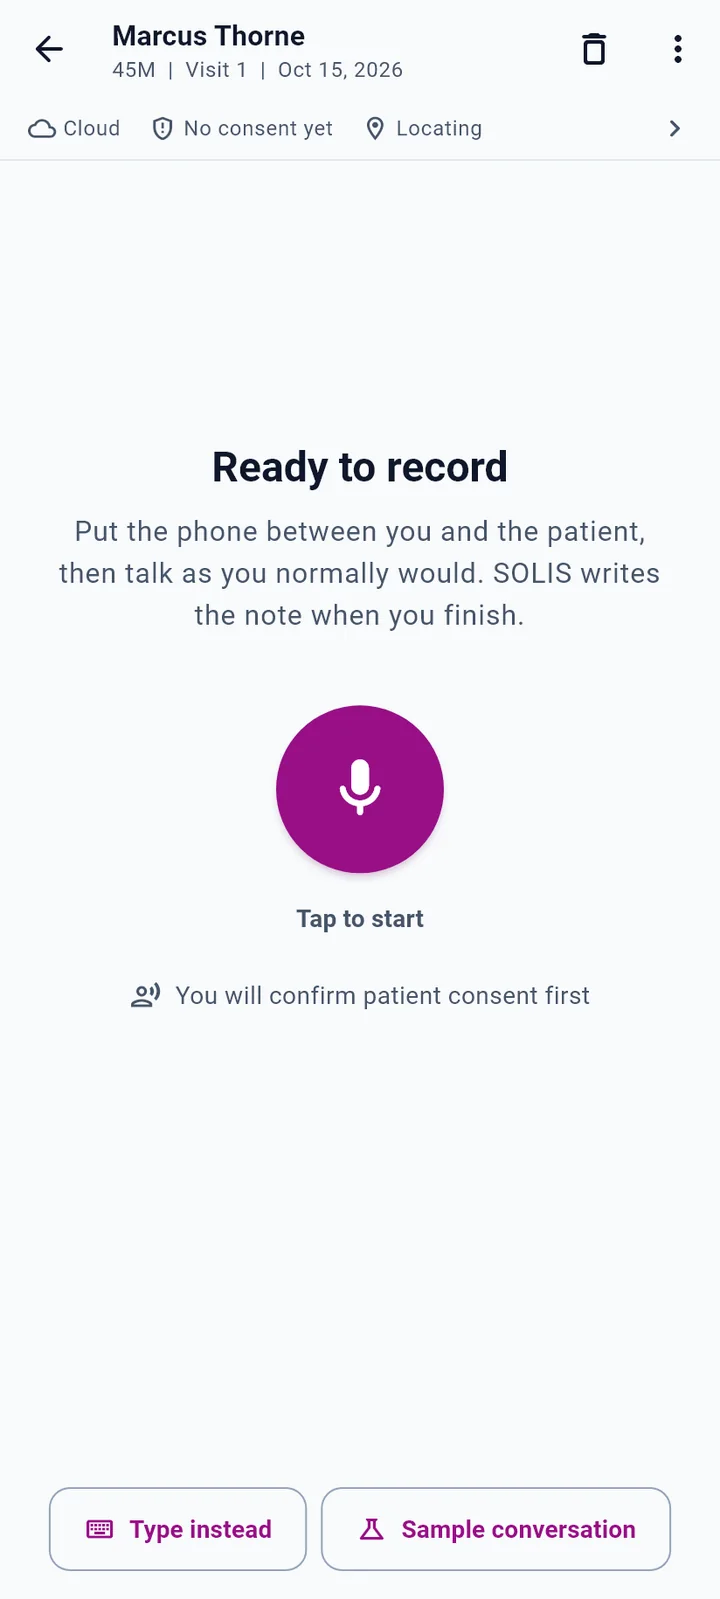
You will see Ready to record: put the phone between you and the patient, then talk as you normally would. SOLIS writes the note when you finish.
The line under the patient's name shows the session at a glance: the engine (Cloud or On device), consent (No consent yet until the patient agrees) and location (Locating, then the address). Tap it to open Session details, where you can set:
- Note engine
- Cloud model, or on-device engine. The cloud model falls back to the device when offline.
- Room noise filter
- Suppresses monitor alarms, HVAC hum and hallway voices.
- Language and accent
- US English (all accents), Southern / regional US, Indian English, or bilingual Spanish and English.
- Background capture
- Turns on automatically while recording, so recording continues with the screen off.
- Location
- Refresh it if the address is wrong. If location is not allowed, the visit is saved without a location rather than a guessed one.
No recording today? Tap Type instead to type or paste the conversation. To practice, Sample conversation inserts a sample visit.
09Ask for consent
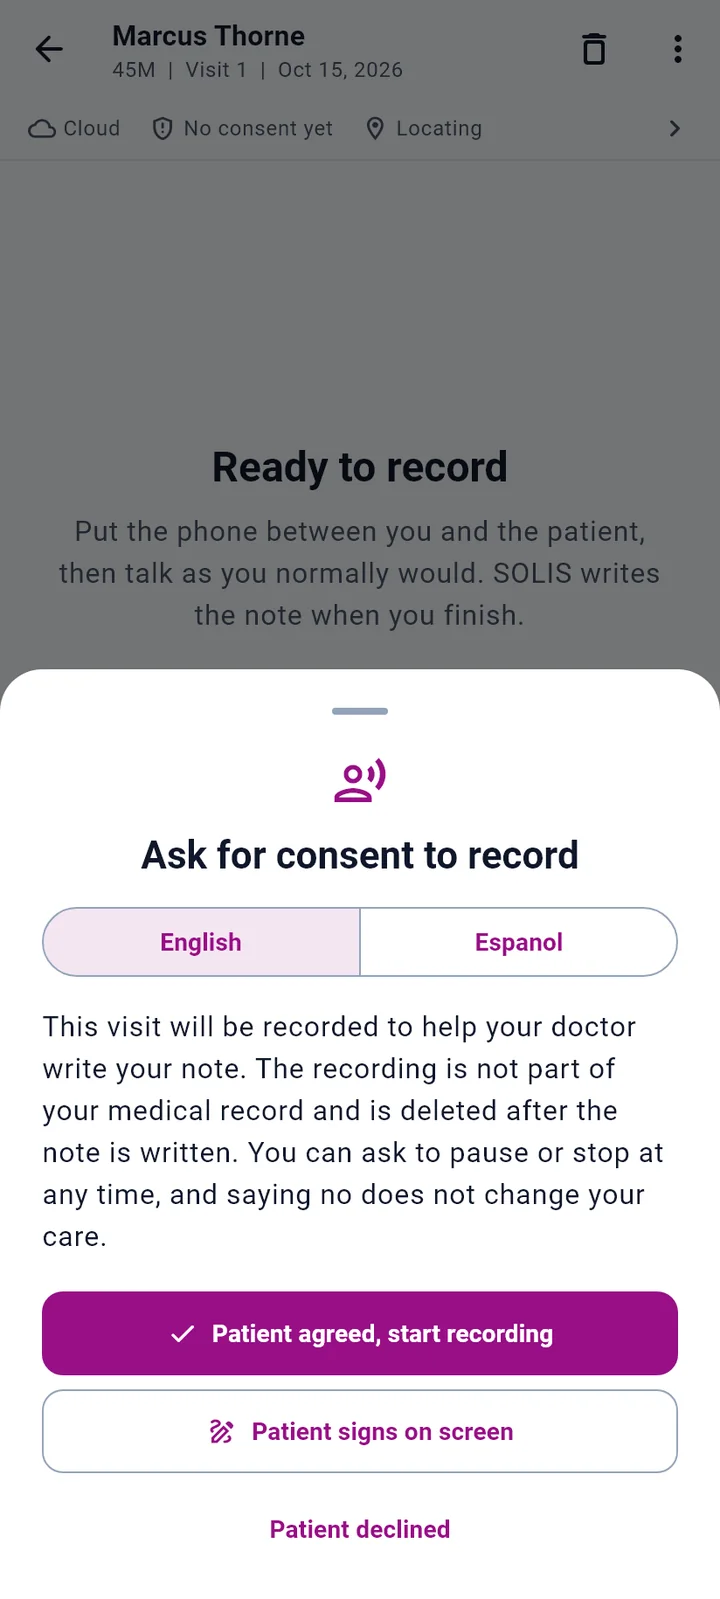
SOLIS asks before the first recording of every visit. Tap the microphone and the Ask for consent to record sheet opens.
- Choose English or Espanol.
- Read the script to the patient, or hand them the phone. In English it says: "This visit will be recorded to help your doctor write your note. The recording is not part of your medical record and is deleted after the note is written. You can ask to pause or stop at any time, and saying no does not change your care."
- Record the answer:
- Patient agreed, start recording for verbal consent. Recording starts right away.
- Patient signs on screen for a signature. The patient, or a parent, legal guardian or authorized representative, types their name, picks the relationship and signs with a finger. Tap Save signature and start.
- Patient declined. Nothing is recorded; you can type the note instead.
The consent, its method and its time and location are saved with the visit, and the status line changes to Consent.
10Record, pause, finish
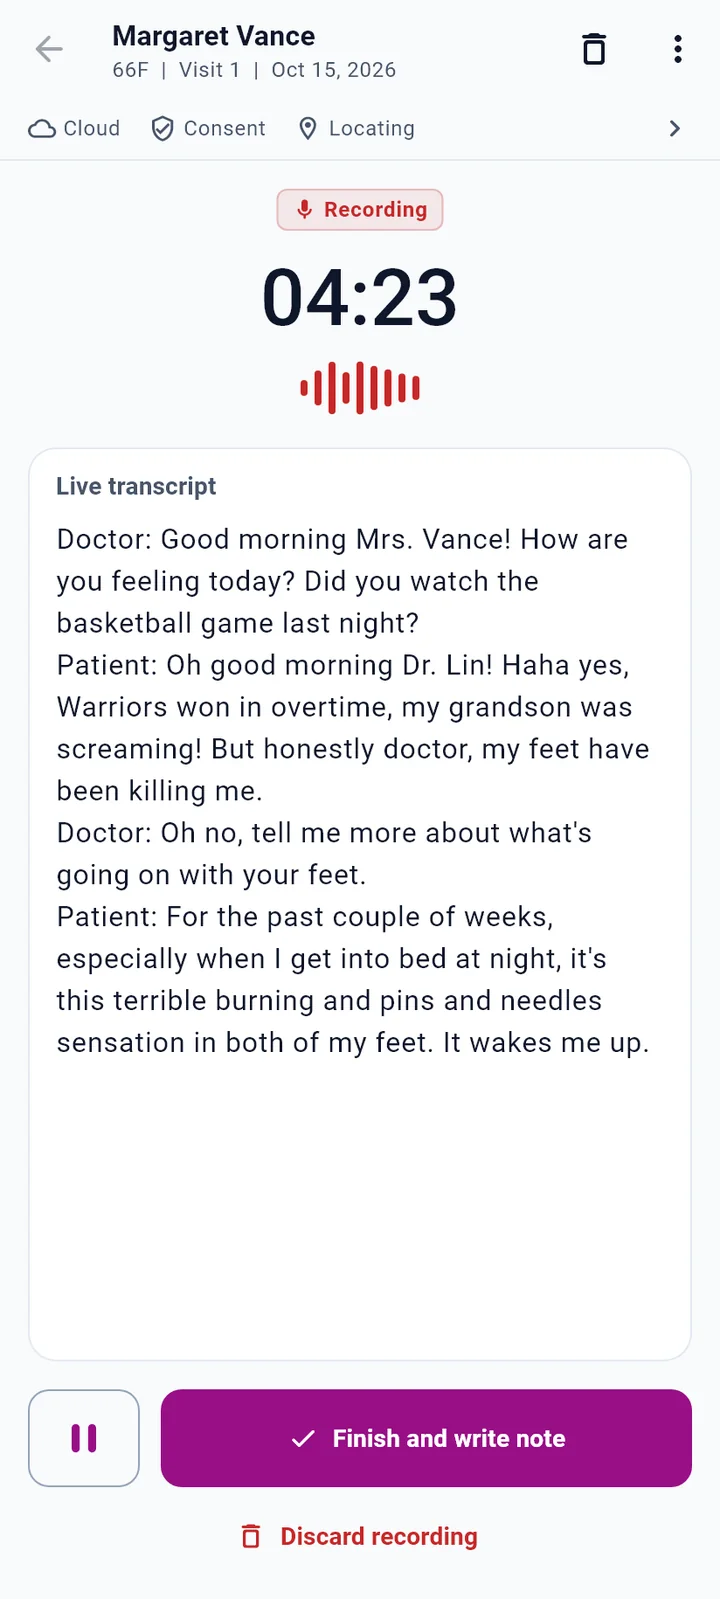
While recording, the screen shows a red Recording tag, a timer and the live transcript.
- Talk with the patient as you normally would. You do not need to dictate or use special phrases.
- To stop for a sensitive topic, or when you step out, tap the pause button on the left. The screen says "Paused. Nothing is being captured." Tap it again to resume.
- When the visit is done, tap Finish and write note. SOLIS shows Writing the note and then opens the review.
Discard recording is for a recording started by accident, or one that captured a conversation that is not about care. It asks before deleting.
You cannot leave the visit while it is recording. Finish or discard first, so nothing is captured by mistake.
Forgot something? After the note is written, tap Add at the bottom to record more of the same visit.
11Review and sign the note
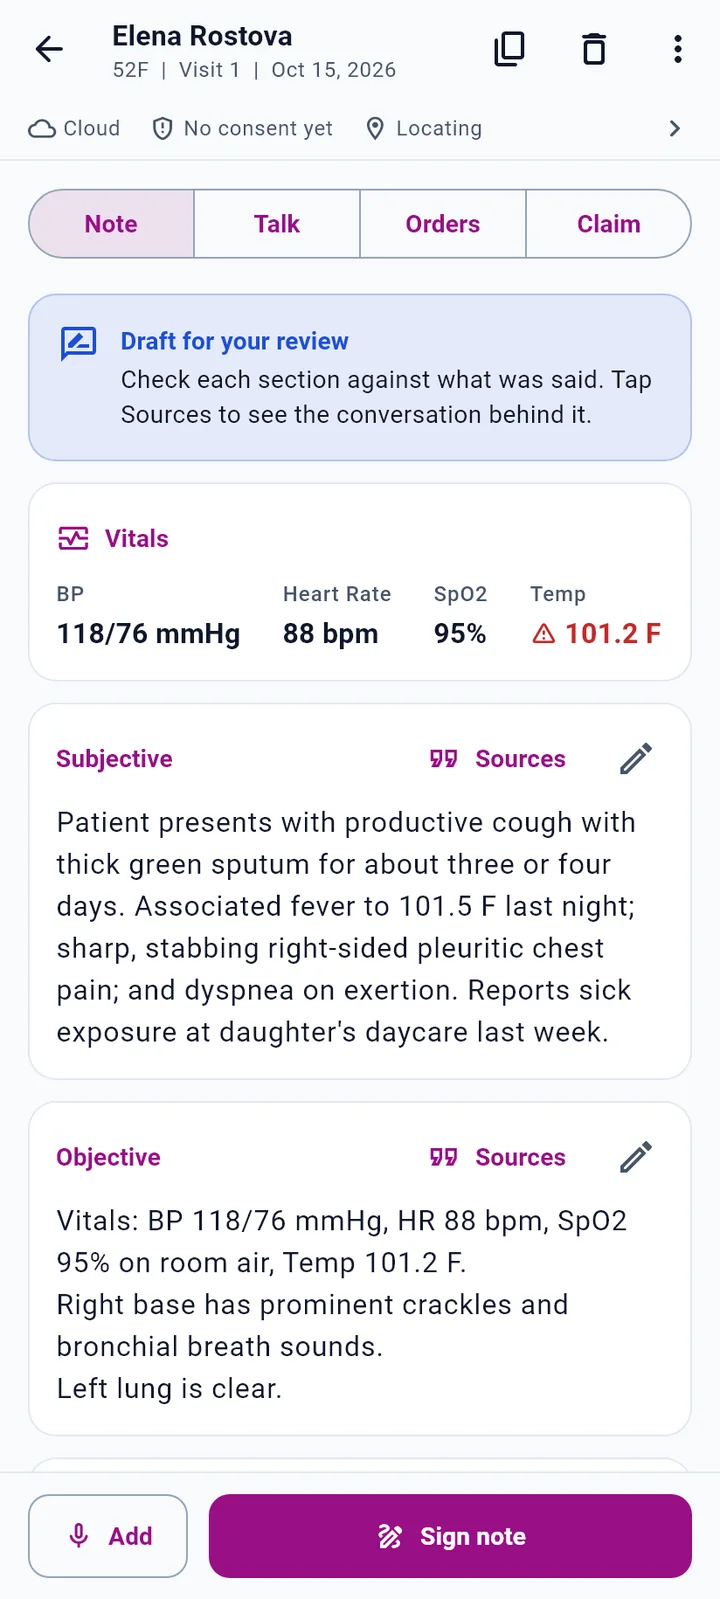
The review has four tabs: Note, Talk, Orders and Claim. It opens on the note, marked Draft for your review.
- Check the Vitals card. Only vitals that were said out loud appear. An abnormal value carries a warning icon next to it, never color alone.
- Read each section: Subjective, Objective, Assessment and the plan. Nothing is invented: no exam findings that were not said.
- Tap Sources on any section to see what was said in the room that supports it.
- Tap the pencil to edit a section. Save your edits before signing.
- Tap Sign note. Read the attestation, which begins "I personally performed this encounter and reviewed this note for accuracy", and confirm.
- The button changes to Signed. Copy note. Tap it to copy the formatted note and paste it into your EHR.
Editing any section after signing reopens the note as a draft, so the signature always matches the text.
12The Talk tab
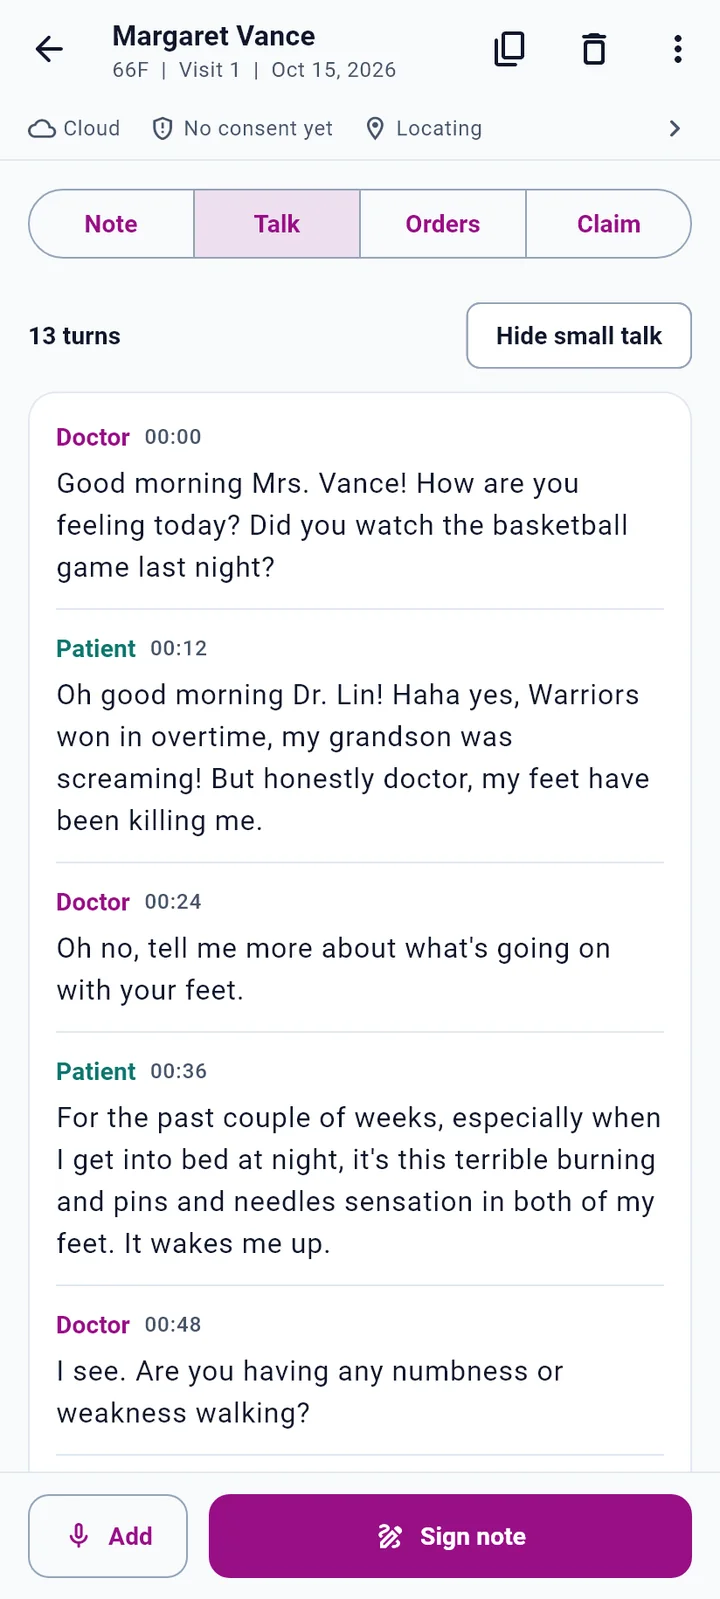
The Talk tab is the conversation, split by speaker: each turn is labeled Doctor or Patient with its time from the start of the recording.
- The count at the top shows how many turns were captured.
- Hide small talk folds away the greetings and chat that are not about care, so you can read the clinical part quickly.
- Open full transcript shows the unedited capture that is archived with the note.
Use it to check a detail before you sign, or when a code's quote on the Claim tab needs more context.
13The Orders tab
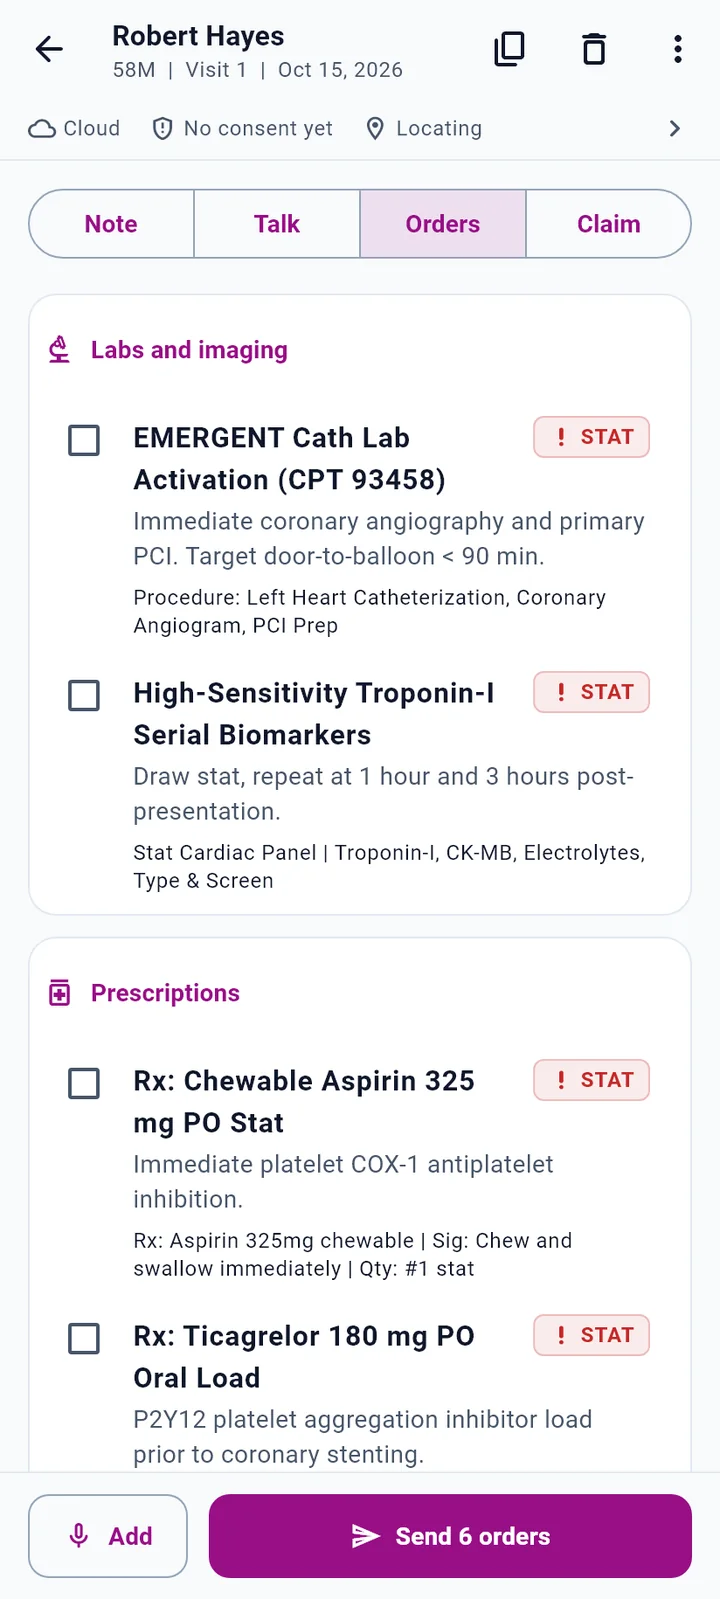
Orders, prescriptions and referrals mentioned in the visit appear here, grouped under Labs and imaging, Prescriptions, Referrals and Prior authorization. Urgent items carry a STAT tag with an icon.
- Read each order and its details, such as dose, sig and quantity for a prescription.
- Check the orders you want. Uncheck anything that does not apply.
- Tap Send with the count, for example Send 6 orders, then confirm the list. SOLIS marks them as sent on the visit, and the button changes to All orders sent.
If nothing was ordered, the tab says so. Nothing is ever added that was not said.
14The Claim tab
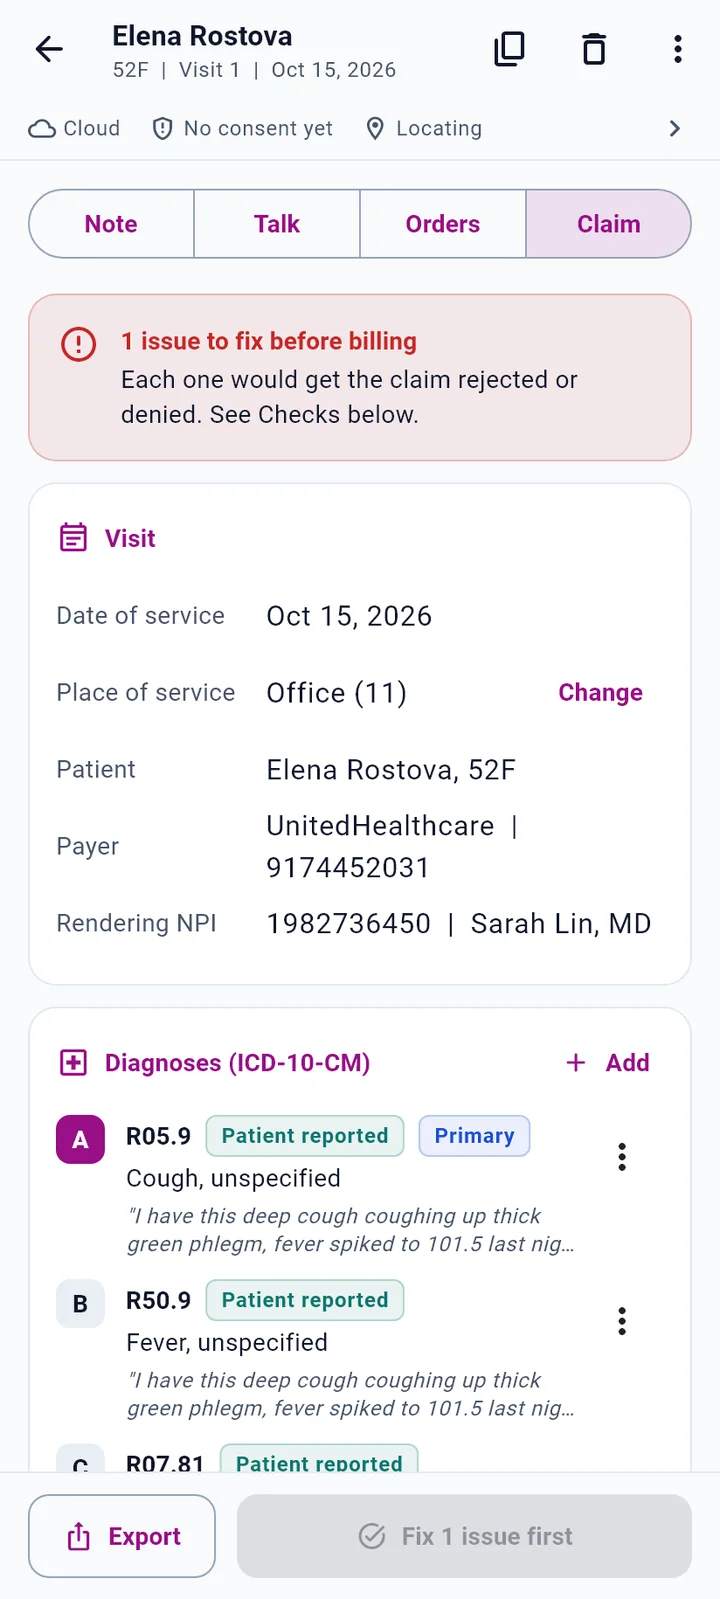
The claim is built when the note is written. The Claim tab shows it the way a payer will read it, and tells you exactly what needs attention.
Read it top to bottom
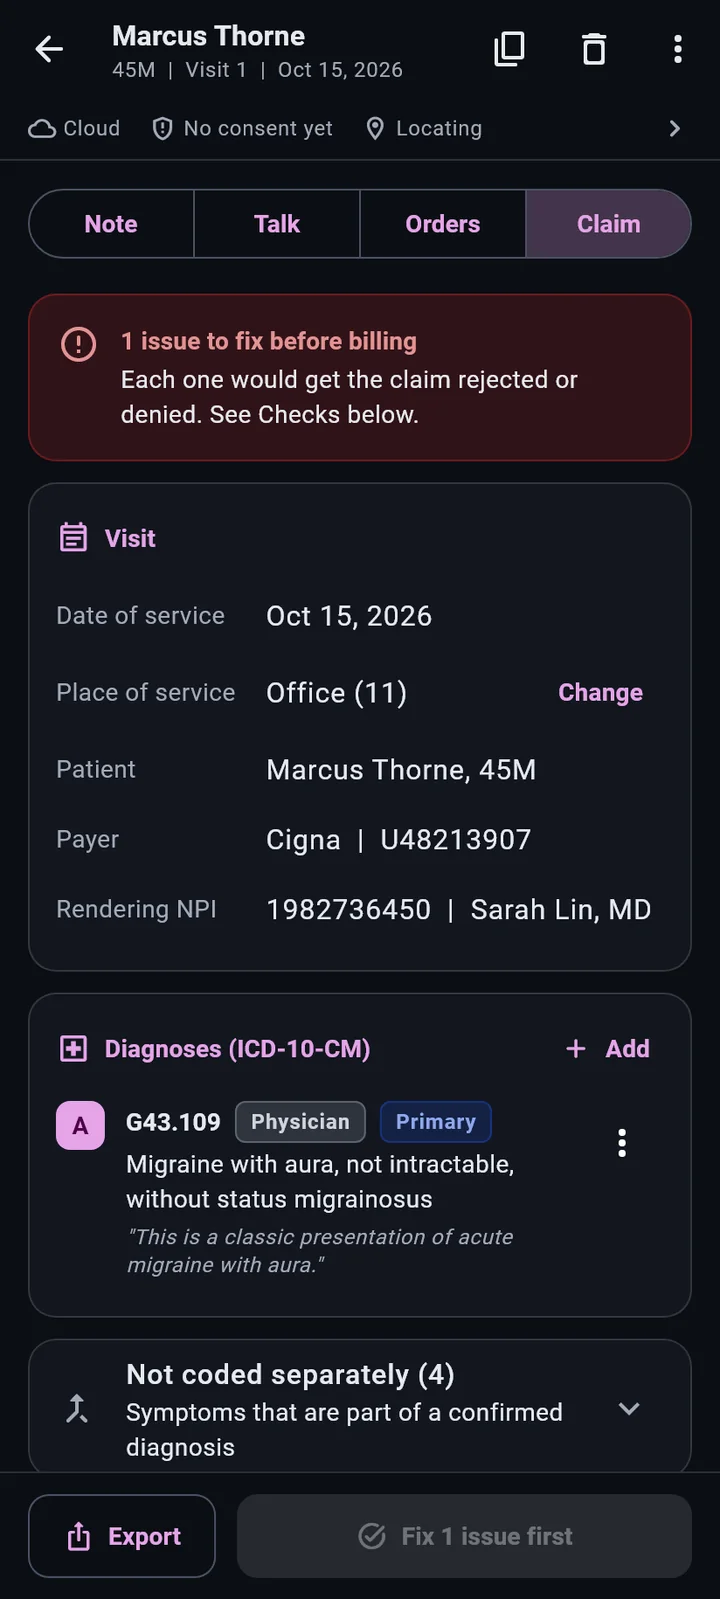
- The banner. "1 issue to fix before billing" means something would get the claim rejected or denied. The details are in Checks, at the bottom.
- Visit. Date of service, place of service (tap Change if it is wrong), patient, payer and member ID, and the rendering NPI from your profile.
- Diagnoses (ICD-10-CM). Lettered A, B, C and so on. Each shows the code, its description, where it came from (Patient reported or Physician), a Primary tag on the first-listed diagnosis, and the patient's or your own words in quotes.
- Services (CPT / HCPCS). Each service shows which diagnosis letters support it, the units and the charge, then the total charge.
- Checks. Every finding, with the reason in plain words.
Confirm uncertain diagnoses
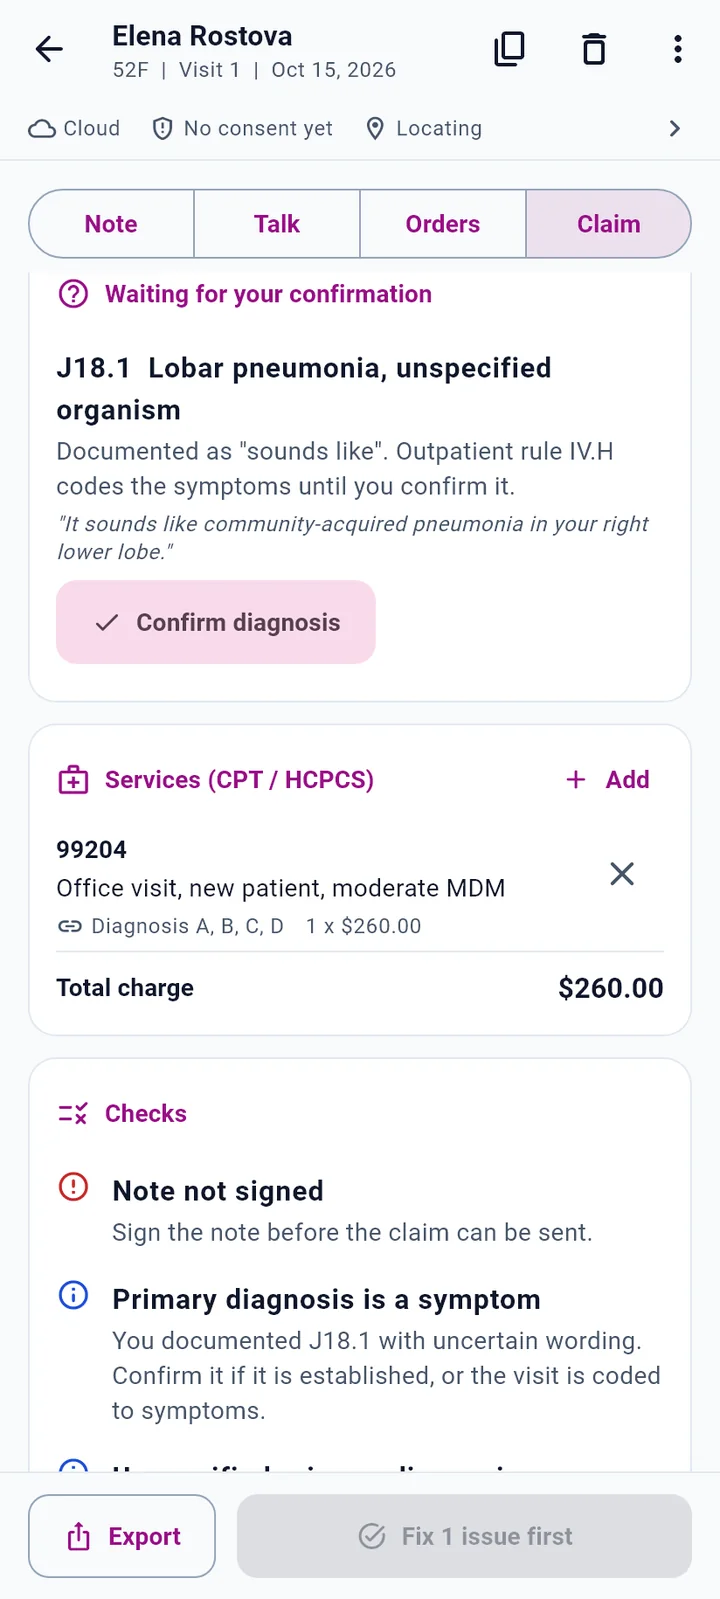
When a diagnosis was said with uncertain wording, such as "sounds like" or "probably", it appears under Waiting for your confirmation. Until you confirm it, the official outpatient rule (section IV.H) codes the symptoms instead. A patient who says "my feet burn at night" gets a symptom code, not a diagnosis.
- Read the quote under the suggested code.
- If the diagnosis is established, tap Confirm diagnosis. It moves into the diagnosis list.
- If not, leave it. The visit stays coded to symptoms, which is correct.
Once a diagnosis is confirmed, symptoms that are part of it move to Not coded separately, so they are not billed twice. Tap that row to see them.
Change codes
- Tap the three-dot menu on a diagnosis to Make primary or Remove from claim. Removing offers Undo.
- Tap Add on Diagnoses and search by condition or ICD-10 code, then Code it.
- Tap Add on Services to add a CPT or HCPCS code with modifiers and a charge per unit. Tap the X on a service to remove it.
Read the checks
Each check has an icon and a plain sentence, so you never have to rely on color.
- Error (circle with !)
- Must be fixed before billing. Example: Note not signed. Sign the note before the claim can be sent.
- Information (circle with i)
- Worth a look, does not block. Example: Primary diagnosis is a symptom. Confirm it if it is established, or the visit is coded to symptoms.
The checks use the official code sets for the date of service. Typical findings: sex or age conflicts, codes that cannot be billed together, a missing 7th character, an external-cause code listed first, modifier 25 needed, an add-on code without its primary, or units over the daily limit.
When there are no errors, the Checks card says "No coding conflicts found. Mark it ready to bill."
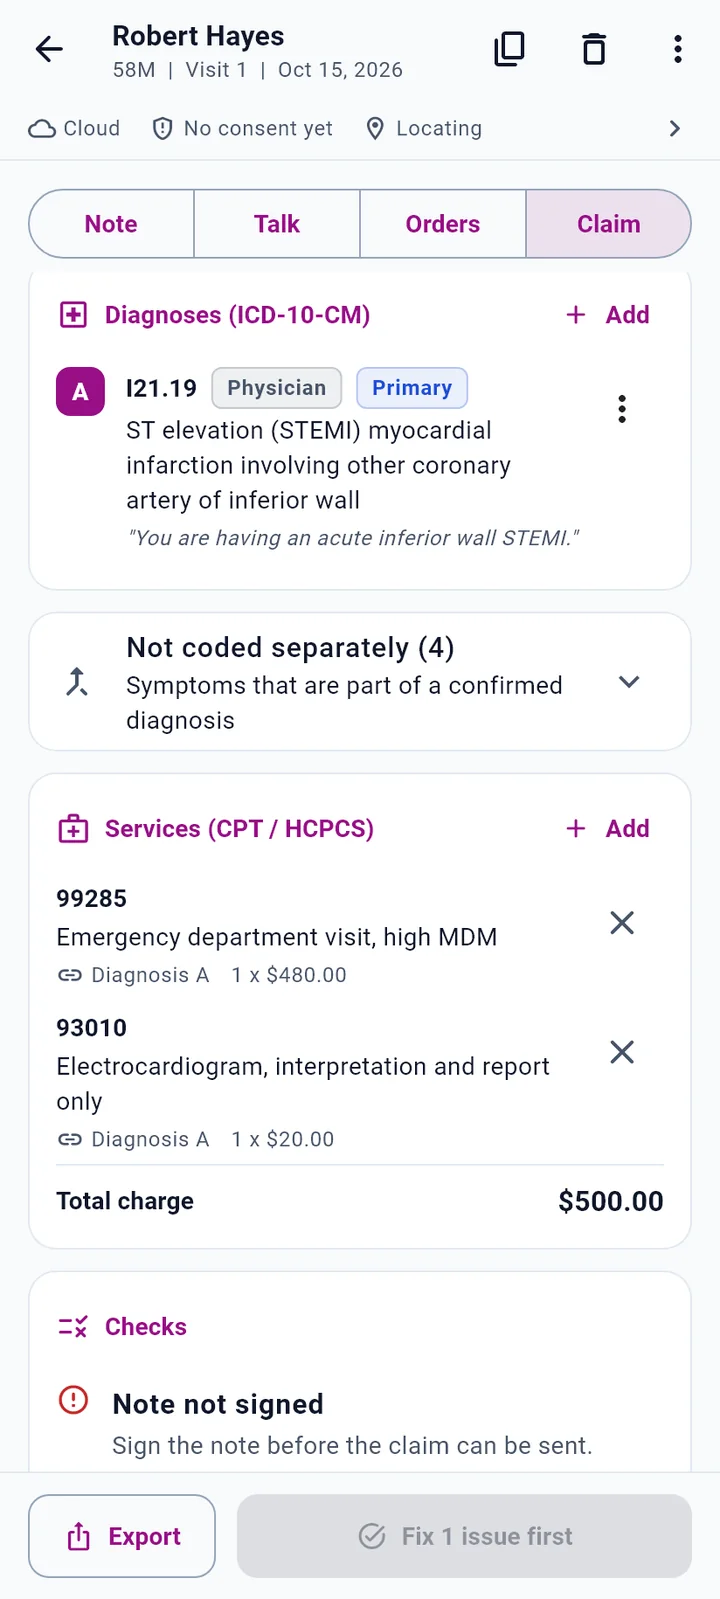
The most common fix is the simplest: sign the note. A claim cannot go out until the note it is built from is signed.
15Eligibility
With a clearinghouse connected, SOLIS checks coverage when you start a visit, and you can check any time from the chart.
- Make sure the insurance card has a payer ID. It is usually on the back of the card; without it SOLIS asks you to add it.
- In the chart's Insurance card, tap Check on the eligibility line, or Recheck after an earlier check.
- Read the result, which is saved on the visit.
| The line says | What to do |
|---|---|
| Eligibility: Active | Coverage is active. When the payer returns them, you also see the copay, coinsurance and deductible left. |
| Not active for the date of service | Ask the patient for current insurance and scan the new card. |
| Last check failed | The reason follows. Check the member ID and payer ID, then Recheck. |
| Not checked yet | Tap Check. |
| Connect a clearinghouse in Integrations | Set up Stedi first. See Integrations. |
In test mode, results are marked "test mode".
16Send a claim and check status
The large button at the bottom of the Claim tab always shows the next step.
- While errors remain, it reads Fix 1 issue first (or the number of issues) and is disabled.
- When there are none, tap Mark ready to bill. The visit becomes Claim ready.
- With a clearinghouse connected, the button becomes Send claim. Tap it. SOLIS builds the 837P file and shows the claim ID and total. In test mode it says "Send test claim?" and reminds you test claims are checked but not paid. Tap Send.
- If something is missing, such as submitter details, SOLIS lists what to fix before sending.
After sending
| Result | What happens next |
|---|---|
| Accepted | The visit is Submitted and the button becomes Check claim status. |
| Rejected | The clearinghouse rejected the claim before it reached the payer, with the reason. Fix it, then tap Fix and resend. |
Tap Check claim status to ask the payer. You may see "Waiting for the payer", "The payer has no status for this claim yet", paid, or "Denied by the payer". The visit's tag in the chart follows along.
No clearinghouse? The button reads Ready. Copy claim. It copies the claim for your billing software. See Export.
17Export
On the Claim tab, tap Export at the bottom left.
- Copy 837P file
- The HIPAA 5010 837P file for this visit, ready for a clearinghouse or billing system. If it cannot be built yet, SOLIS lists what is missing.
- Copy JSON
- The claim as JSON with the CMS-1500 and 837P fields, for billing software.
For the note, use Signed. Copy note on the Note tab, or the copy icon at the top of the visit. The visit menu (three dots) also has Export FHIR R4, which copies a FHIR bundle.
18Visits 1, 2, 3 by date
Each patient has one account and as many visits as you need. Every visit has its own number, date of service and place of service, so a nursing-home visit and an office visit for the same patient each get the right codes.
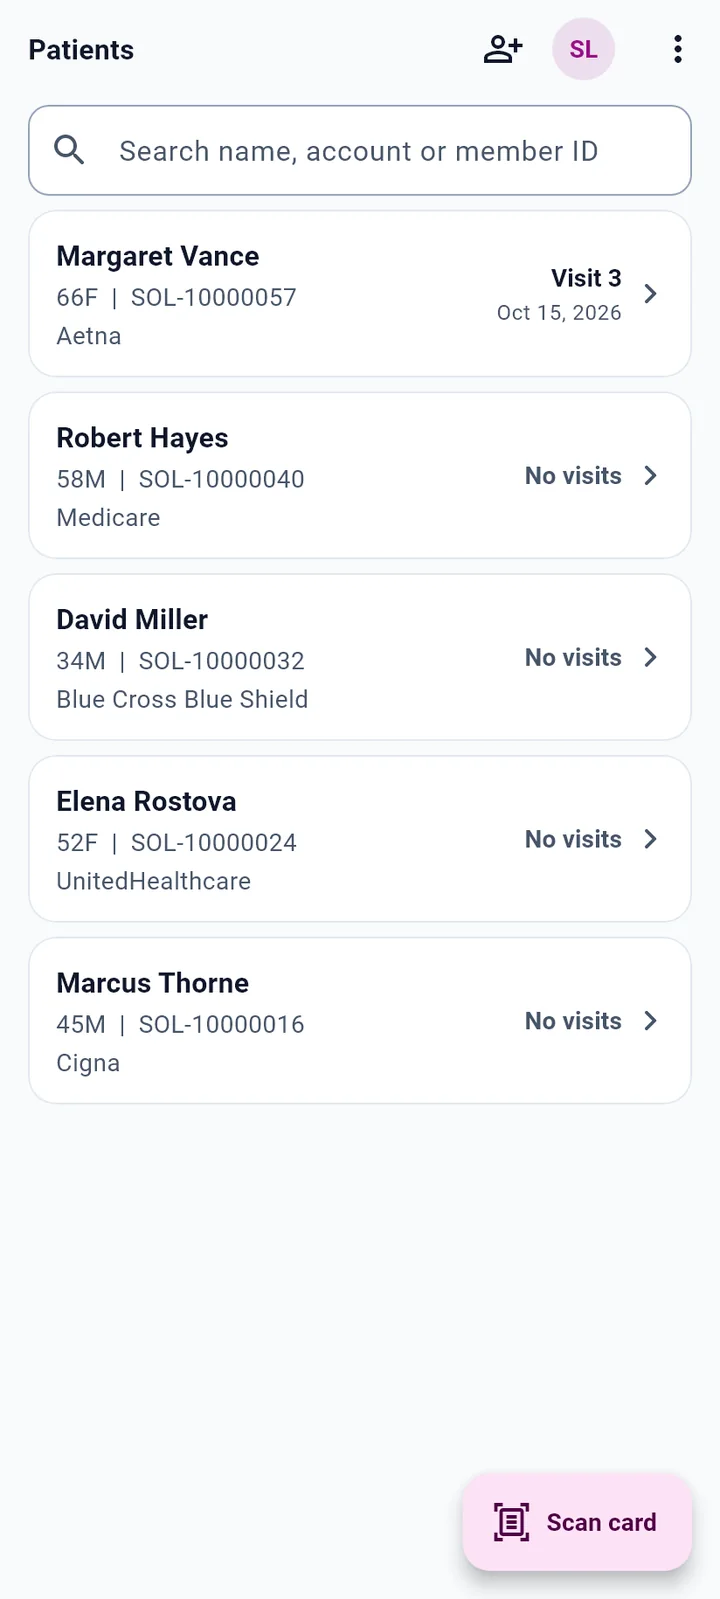
- The Patients list shows each patient's latest visit and its date, or No visits.
- Open the chart to see every visit, newest first, with its status.
- Tap an earlier visit to reopen its note, talk, orders and claim.
To remove a visit created by mistake, open it and tap the delete icon at the top. SOLIS asks before it discards the visit.
19Offline and on-device mode
On-device mode keeps the audio on the phone and works without a connection, for rounds, rural clinics and ambulances.
- Download the speech models once over Wi-Fi in Integrations (about 150 MB).
- Turn on Process notes on this device on the sign-in screen, or choose the on-device engine in a visit's Session details.
- Record as usual. The status line shows On device.
- On device
- Notes are written on this phone. Nothing leaves the device until backup.
- Cloud
- Notes are written by the cloud model, and fall back to the device when offline.
Sending claims and checking eligibility need a connection. Do them when you are back online.
20Troubleshooting
Check that SOLIS has microphone permission and that nothing covers the microphone. Or type the conversation instead with Type instead.
Download the on-device speech models in Integrations, or type the conversation instead.
Recording did not stop. The rest of the visit is captured without speaker labels. Check speaker labels on the Talk tab before signing.
Hold the card flat, fill the frame and avoid glare. Try From photos with a sharper picture, or type the fields.
Allow location for SOLIS in Android settings to tag visits, then tap Refresh location in Session details. The visit is saved without a location rather than a guessed one.
Scan the back of the insurance card, or type the payer ID in the patient's details.
Fill in submitter name, submitter ID and contact in Integrations, then try again.
SOLIS lists each missing item, often a provider detail such as tax ID or address. Complete your provider profile.
Read the reason, correct it on the Claim tab or in the patient's details, and tap Fix and resend.
Use Wi-Fi and make sure the phone has free space, then tap Download again. It resumes where it stopped.
Tap Finish and write note, or Discard recording, then go back.
Save the section you were editing, then tap Sign note.
21Questions
Does SOLIS add anything that was not said?
No. The note includes no vitals or exam findings that were not said, and every diagnosis links to the words it came from. Use Sources on each section to check.
Why is my patient's diagnosis coded as a symptom?
Uncertain wording such as "sounds like" or "probably" is coded to the symptoms under official outpatient rule IV.H, until you confirm the diagnosis on the Claim tab.
Where does the audio go?
In on-device mode, nowhere: it stays on the phone. In cloud mode, used only when your practice turns it on, transcription uses the Deepgram medical model and Claude writes the note. See How SOLIS handles data.
What happens to card photos?
They are read on the phone and deleted after reading. From an SSN card only the last 4 digits are kept.
Can the patient consent in Spanish?
Yes. Tap Espanol on the consent sheet. The patient can agree verbally or sign on the phone.
Will test claims be paid?
No. Test claims are checked by the clearinghouse but not paid. Switch Integrations to Production after payer enrollment is complete.
Can I use SOLIS without a clearinghouse?
Yes. Notes, coding and checks all work. Copy the claim as an 837P file or JSON for your billing software.
Is there an iPhone app?
Not yet. SOLIS 1.0 is Android only.
Is a BAA available?
Yes. A Business Associate Agreement template is available for practices. Ask for it when you request early access.
Why does SOLIS not show full CPT descriptions?
Official CPT descriptor text is licensed by the American Medical Association. SOLIS shows short plain-language labels instead.